Boilsoft TS to APE Converter tutorial
If you are puzzled by how to extract audio from TS to ape formats, our TS to ape converter may be the solution!
Glossary:
Transport stream (TS) is a standard format for transmission and storage of audio, video, and data, and is used in broadcast systems such as DVB and ATSC.Transport Stream is specified in MPEG-2 Part 1, Systems (formally known as ISO/IEC standard 13818-1 or ITU-T Rec. H.222.0).Transport stream specifies a container format encapsulating packetized elementary streams, with error correction and stream synchronization features for maintaining transmission integrity when the signal is degradedThe connection of Transport Stream to Program Stream is as follows. Firstly, PS is designed for reasonably reliable media, such as disks (like DVDs), while TS is designed for less reliable transmission, namely broadcast. Further, Transport Stream transmissions may carry multiple Program Streams.
Monkey's Audio (APE) is a file format for audio data compression. Being a lossless format, Monkey's Audio does not discard data during the process of encoding, unlike lossy compression methods such as AAC, MP3, Vorbis and Musepack.Data file compression is employed in order to reduce bandwidth, file transfer time, and/or storage requirements. A digital recording (such as a CD) encoded to the Monkey's Audio format can be decompressed into an identical copy of the original audio data. As with the FLAC and Apple Lossless format, files encoded to Monkey's Audio are typically reduced to about half of the original size, with data transfer rates and bandwidth requirements being reduced accordingly.
How to convert?

Step 1 Add video or audio formats
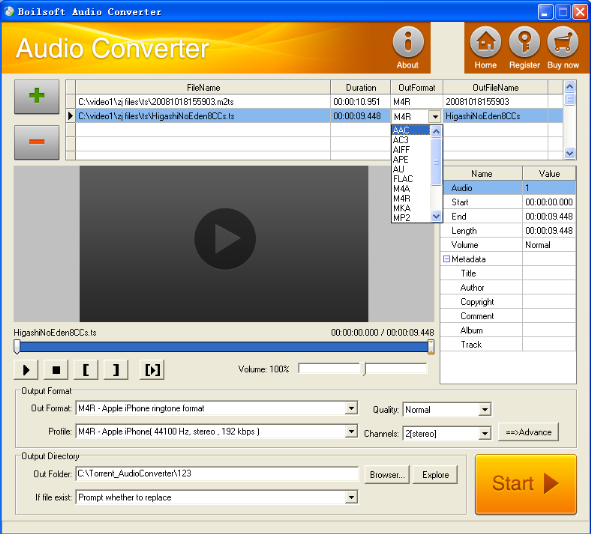
Press Add to add the TS files you want to convert, then select APE as the output format.
Step 2 Edit the file(Optional)
Press
![]() to play the files and the timer will start to work. Press
to play the files and the timer will start to work. Press
![]() to stop.
to stop.
This feature is designed for you to measure your favorite segment.
When you want to designate the segment, you can press
![]() to set starting time and
to set starting time and
![]() ending time.
ending time.
Press
![]() to listen to the selected segment.
to listen to the selected segment.
Step 3 Customize the audio (Optional)
As can be seen from the diagram, the panel allows you to set the expected volume and output format of the audio, and to customize the sample rate, Bit rate and channels the audio will contain.
Press
![]() to listen to the audio.
to listen to the audio.
Step 4 Customize the metadata information (Optional)
We can see from the picture that the metadata information of the output audio, such as title, author, copyright, comment, album, track, can be customized merely by typing in what you want to display!
Step 5 Get your cool melody
When all settings are completed, just press Start Button to gain your favorite APE from your output directory soon.

