Home > Boilsoft Audio Converter > Formats > XviD to WMA
Boilsoft XviD to WMA Converter tutorial
Wma, as powerful as mp3, excels at the file size than the latter one. Our XVID to WMA Converter can be the best solution to such a kind of conversion.
Glossary
Xvid (formerly "XviD") is a video codec library following the MPEG-4 standard, specifically MPEG-4 Part 2 Advanced Simple Profile (ASP). It uses ASP features such as b-frames, global and quarter pixel motion compensation, lumi masking, trellis quantization, and H.263, MPEG and custom quantization matrices.Xvid is a primary competitor of the DivX Pro Codec (Xvid being DivX spelled backwards). In contrast with the DivX codec, which is proprietary software developed by DivX, Inc., Xvid is free software distributed under the terms of the GNU General Public License. This also means that unlike the DivX codec, which is only available for a limited number of platforms, Xvid can be used on all platforms and operating systems for which the source code can be compiled.
Windows Media Audio (WMA) is an audio data compression technology developed by Microsoft. The name can be used to refer to its audio file format or its audio codecs. It is a proprietary technology that forms part of the Windows Media framework. WMA consists of four distinct codecs. The original WMA codec, known simply as WMA, was conceived as a competitor to the popular MP3 and RealAudio codecs. WMA Pro, a newer and more advanced codec, supports multichannel and high resolution audio.[A lossless codec, WMA Lossless, compresses audio data without loss of audio fidelity (the regular WMA format is not lossless).And WMA Voice, targeted at voice content, applies compression using a range of low bit rates.
How to convert?
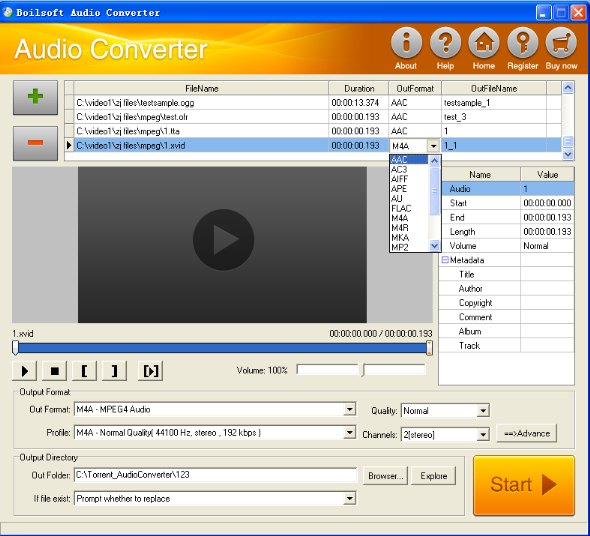
Step 1 Add video or audio formats
Press Add to add the XviD you want to convert, then select WMA as the output format.
Step 2 Edit the file (Optional)
Press
![]() to play the files and the timer will start to work. Press
to play the files and the timer will start to work. Press
![]() to stop.
to stop.
This feature is designed for you to measure your favorite segment.
When you want to designate the segment, you can press
![]() to set starting time and
to set starting time and
![]() ending time.
ending time.
Press
![]() to listen to the selected segment.
to listen to the selected segment.
Step 3 Customize the audio (Optional)
As can be seen from the diagram, the panel allows you to set the expected volume and output format of the audio, and to customize the sample rate, Bit rate and channels the audio will contain.
Press
![]() to listen to the audio.
to listen to the audio.
Step 4 Customize the metadata information (Optional)
We can see from the picture that the metadata information of the output audio, such as title, author, copyright, comment, album, track, can be customized merely by typing in what you want to display.
Step 5 Get your cool melody
When all settings are completed, just press Start Button to gain your favorite WMA from your output directory soon.
Tutorials


Copyright © 2023 Boilsoft Systems International Inc. All rights reserved.